Configuration de la base de données Oracle
This document will cover the setup and preparation of the ownCloud server to support the use of Oracle as a backend database. For the purposes of testing, we are using Oracle Enterprise Linux as both the Web server that will host ownCloud, and as a host for the Oracle Database.
Outline of Steps
This document will cover the following steps:
- Setup of the ownCloud user in Oracle: This involves setting up a user space in Oracle for setting up the ownCloud database.
- Installing the Oracle Instant Client on the Web server (facilitating the connection to the Oracle Database).
- Compiling and installing the Oracle PHP Plugin oci8 module
- Pointing ownCloud at the Oracle database in the initial setup process
The document assumes that you already have your Oracle instance running, and have provisioned the needed resources. It also assumes that you have installed ownCloud with all of the prerequisites.
Configuring Oracle
Setting up the User Space for ownCloud
Step one, if it has not already been completed by your DBA, provision a user space on the Oracle instance for ownCloud. This can be done by logging in as a DBA and running the script below:
CREATE USER owncloud IDENTIFIED BY password;
ALTER USER owncloud DEFAULT TABLESPACE users TEMPORARY TABLESPACE temp QUOTA unlimited ON users;
GRANT create session, create table, create procedure, create sequence, create trigger, create view, create synonym, alter session TO owncloud;
Substitute an actual password for password. Items like TableSpace, Quota etc. will be determined by your DBA.
Downloading and Installing the Oracle Instant Client
As our example system is Oracle Enterprise Linux, it is necessary to go to the Oracle site and download the Oracle Instant Client for your OS Distribution.
Note
Download the instant client and the instant client SDK and place them in a directory on the server, in this example they are RPM packages.
- Install the basic client from the RPM. Use the rpm –ivh command
- Install the SDK RPM package. Use the rpm –ivh command
At this point, the Oracle Instant client is installed on the ownCloud Host (in the home directory).
Install the OCI8 PHP Extension:
The next step is to compile and install the OCI8 PHP extension for connectivity to the Oracle Database.
Create a folder for these bits on your server.
Download the latest version of the extension from http://pecl.php.net/package/oci8.
Unpack the OCI8 PHP extension and copy it over to the server.
- There should be two things in the folder:
- package.xml file
- oci8-*.*.* folder (folder will change based on version of the extension you downloaded).
- Build the OCI8 module.
Change (cd) to the folder where you have copied the downloaded and uncompressed OCI8 bits.
Run the following command (there will be a significant amount of output):
pecl build
- Eventually the output will stop and ask for the Oracle Home Directory, just press enter.
Change directory:
cd oci8-<version number>
Type the following command:
./configure –with-oci8=instantcleint,/usr/lib/oracle/<version number>/client64/lib
Again, there will be significant output
Enter the following command to compile: make
At this time there should be a folder called modules in the oci8-<version_> folder. Within this folder exists the oci8.so file.
Copy this to the directory where the modules are stored in the PHP install. It depends on your distribution. This is the path for RHEL 6 and OEL 6:
cp oci8.so /usr/lib64/php/modules
- Create an .ini file
Navigate to the php.d directory: cd /etc/php.d
Edit a file called oci8.ini: vi oci8.ini
Make the file look as follows:
; Oracle Instant Client Shared Object
extension=oci8.so
Save the document
Configure ownCloud
The next step is to configure the ownCloud instance to point to the Oracle Database, again this document assumes that ownCloud has previously been installed.
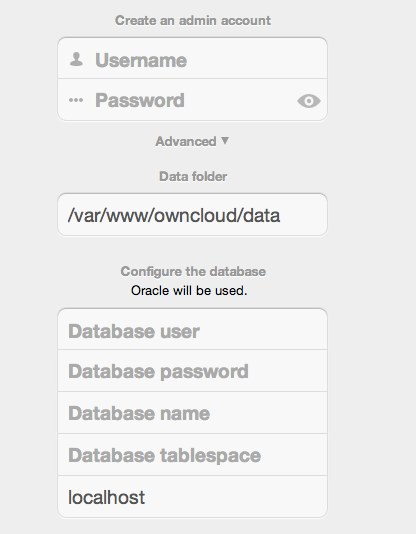
Configuration Wizard

Database user
This is the user space created in step 2.1. In our Example this would be owncloud.
Database password
Again this is defined in the script from section 2.1 above, or pre-configured and provided to you by your DBA.
Database Name
Represents the database or the service that has been pre-configured on the TSN Listener on the Database Server. This should also be provided by the DBA. In this example, the default setup in the Oracle install was orcl (there is a TSN Listener entry for orcl on our database server).
This is not like setting up with MySQL or SQL Server, where a database based on the name you give is created. The oci8 code will call this specific service and it must be active on the TSN Listener on your Oracle Database server.
Database Table Space
Provided by the DBA. In this example the users table space (as is seen in the user creation script above), was used.
Configuration File
Assuming all of the steps have been followed to completion, the first run wizard should complete successfully, and an operating instance of ownCloud should appear.
The configuration file should look something like this:
<?php
$CONFIG = array (
'instanceid' => 'abcdefgh',
'passwordsalt' => '01234567890123456789',
'datadirectory' => '/var/data',
'dbtype' => 'oci',
'version' => '8.2.x.y',
'dbname' => 'orcl',
'dbhost' => '192.168.1.57',
'dbtableprefix' => 'oc_',
'dbuser' => 'owncloud1',
'dbpassword' => '********',
'installed' => true,
);
Useful SQL Commands
Is my Database Reachable?
On the machine where your Oracle database is installed, type:
sqlplus username
SQL> select * from v$version;

BANNER
--------------------------------------------------------------------------------
Oracle Database 11g Express Edition Release 11.2.0.2.0 - 64bit Production
PL/SQL Release 11.2.0.2.0 - Production
CORE  11.2.0.2.0      Production
TNS for Linux: Version 11.2.0.2.0 - Production
NLSRTL Version 11.2.0.2.0 - Production

SQL> exit
Show Database Users:
Oracle : SELECT * FROM all_users;
Show available Databases:
Oracle : SELECT name FROM v$database; (requires DBA privileges)
Show ownCloud Tables in Database:
Oracle : SELECT table_name FROM user_tables;
Quit Database:
Oracle : quit


